There are three ways to create a roster from scratch in MADE. There are additional methods for combining existing rosters, described here.
1. Using Column Filters and Measures in Population Navigator
This method involves filtering the beneficiaries in Population Navigator to those of interest and saving the resulting list as a roster. Note that Column filters and Measures can be used in conjunction or separately.
- First, ensure the population is of interest by reviewing which Attribution Type(s) is selected.
- To filter using values from a column(s), hover over the column, click the triangle that appears, then hover over “Filters” before entering the value(s) of interest. (For more information about the column descriptions, see the sections titled “Population Navigator Columns” and “Population Navigator Column Selection and Filters” in the MADE User Guide).
- In the image below, the population is filtered to those with more than 5 inpatient admissions in the latest 12 months of CCLF data. Depending on the data type for a column, the filter may be numeric (as depicted below), free text (e.g., Patient Name), multiselect (e.g., Dual Eligibility), or a date (e.g., DOB).
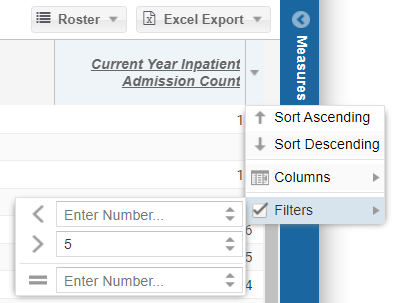
- n.b. A column with a filter applied is indicated by the heading being underlined and italicized.
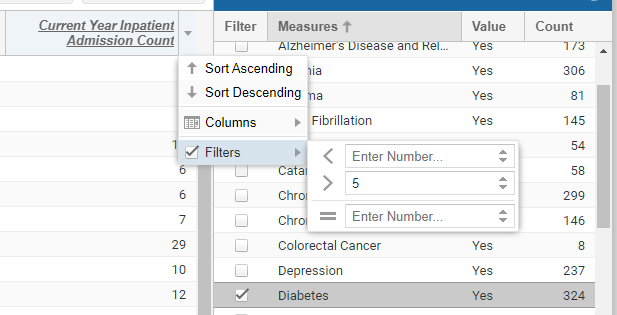
- To filter using one or more Measures, make selections in the Measures menu on the right side of Population Navigator. (For more information about the measure descriptions, see the section titled “Measures” in the MADE User Guide).
- The image below shows that of those with more than 5 inpatient admissions in the latest 12 months of CCLF, there are 324 who have CCW diabetes.
- The image below shows that of those with more than 5 inpatient admissions in the latest 12 months of CCLF, there are 324 who have CCW diabetes.
- Having applied all the column filters and/or measure selections of interest, you are ready to create a roster.
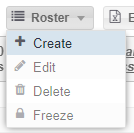
- Use the Roster dropdown menu and select “Create”
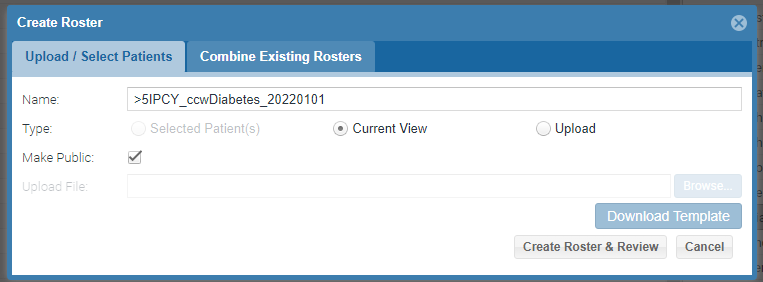
- In the “Create Roster” dialogue, leave “Current View” selected to create a roster with the beneficiaries filtered in Population Navigator. Click the “Make Public” checkbox to allow others users at your organization to use this roster (note that only you can modify/delete it even when made public).
- After clicking “Create Roster & Review” the list of beneficiaries to be included is presented. To finalize the roster, click “Accept” or to make any modifications, click “Discard”
- Use the Roster dropdown menu and select “Create”
- Your roster has been created!
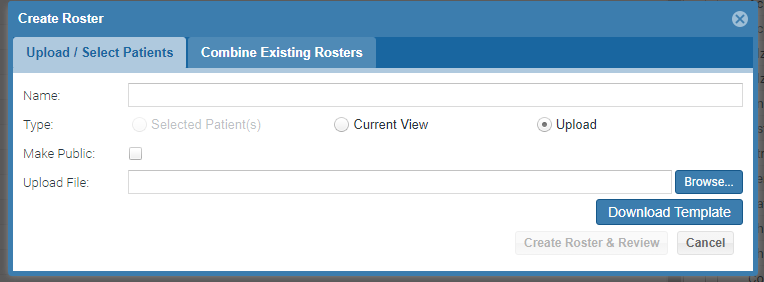
2. Create a Roster by Uploading a Custom List
If you already have a list of beneficiaries to include in a roster, you may upload a custom list.
- Using the Roster dropdown menu, select “Create.”
- In the “Create Roster” dialogue, select “Upload.”
- The Upload File section is now available (previously grayed out if you chose “Current View” in the example above)
- Click “Download Template” to download a blank Excel file that you will use to list the beneficiaries for your roster.
- Open the downloaded template file, and for each beneficiary to be included, populate columns A, B, C, and D, corresponding to “Patient Last Name,” “Patient First Name,” “Gender,” and “DOB.”
- Please note that these 4 fields must exactly match for each beneficiary when creating the roster. More information on troubleshooting this process is available below.
- Fields beyond the first four can be populated if of interest. Any information entered for these fields will then be present in the respective Population Navigator Column the uploaded list of beneficiaries. (See the section titled “User Defined Fields” in the MADE User Guide for more information on these columns).
- b. Do not modify the template beyond entering information. Even if not entering information into any fields beyond column D, the template must be fully intact for the upload to function.
- Save the populated template and return to the Roster Creation dialogue and click the “Browse” button.
- Select the populated template file.
- Enter a name for the roster and decide whether to “Make Public.”
- Click “Create Roster & Review”
- If any entries in the template cannot be matched, you will see a popup indicating the number of mismatched records and will be prompted with the option to download the list of invalid records.
- After selecting an option from Upload Failed message or if all records were successfully matched, you will see the preview listing the beneficiaries that will be included in the roster.
- Select “Accept” to complete the roster creation or “Discard” to not create the roster.
- Reviewing the records with failed match includes a “Reject Reason.”
- If any of the four required fields does not match exactly, the reason will show “Patient Not Found in Database”
- If the beneficiary is found but is not available to the hospital, the reason will show “Patient Not Attributed.”

Troubleshooting Uploaded Roster Template Issues
The most effective way to troubleshoot mismatches in uploading a roster is to find the four required matching fields for an individual in Population Navigator.
The most frequent reasons for uploaded records to not find matches are:
- The beneficiary’s PHI is not available to the hospital.
- Name is spelled differently in MADE than the source used to populate the uploaded template
- g., “John” is used in the template, and the beneficiary is “Jonathan” in MADE.
- A suffix is present, missing, or otherwise inconsistent.
- g., “Doe Jr.” is used in the template, and the beneficiary is “Doe II” in MADE.
- There can also be inconsistencies in the DOB and Gender fields.
The most straightforward way to troubleshoot mismatched records is to filter on one or a combination of the four fields (First Name, Last Name, Gender, and DOB) in Population Navigator and check that against the source used to populate the template.
3. Create a Roster from within a Report
Some reports in MADE include a button to “Create Roster” in the top right of the view when a table of beneficiaries is presented. This option is present when navigating to beneficiary level drill throughs in the Pharmacy Module as well as the Hospital Touch (Belong) Report in the Monitoring Module. Clicking the “Create Roster” button will show the roster creation dialogue depicted above but with the only option being to use “Selected Patient(s).” The result of creating a roster this way will include all beneficiaries present in the view. Rosters created this way can be used and are available in the same way as rosters created in Population Navigator.


